

This thread has long been belated.
I am making this thread for one simple reason: repetition. Most people would agree I’m not a rude person; some may say I’m a bit of a pushover when it comes to going out of my way to give someone info that really shouldn’t have to be spoon fed to someone. I’m not intentionally complaining, but every week or two I get about two or three Pm’s where people ask me, “Hey man, sick car. What body kit is that? Do you like it? Thanks man!” Now I am not trying to toot my own horn, but yes, I know my car looks good with my body kit, but there is a reason why it looks nice. Back on subject, these Pm’s don’t really annoy me that much, until now. It seems that they are becoming more frequent, and when I stop to spend a few minutes per Pm to reply and give them a short synapse of my body kit and how I feel about it, the time spent replying to these PM’s is beginning to build up. I have stated how I feel about the body kit many times in many threads and PM’s, but I am going to write it now in a thread with body kit in the title, so hopefully those who search can actually find this, and hopefully answer their own questions instead of assembly lining them back to me or others on the forum.
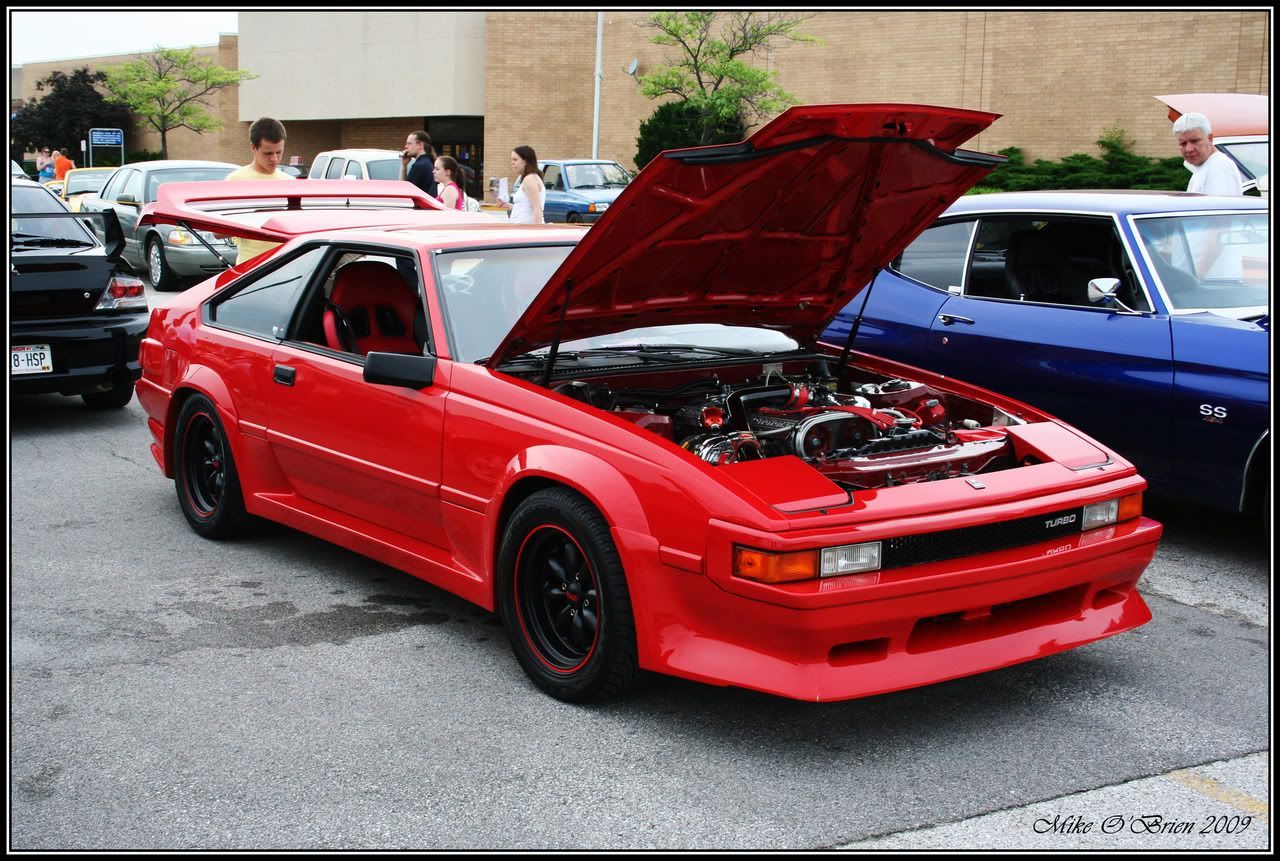
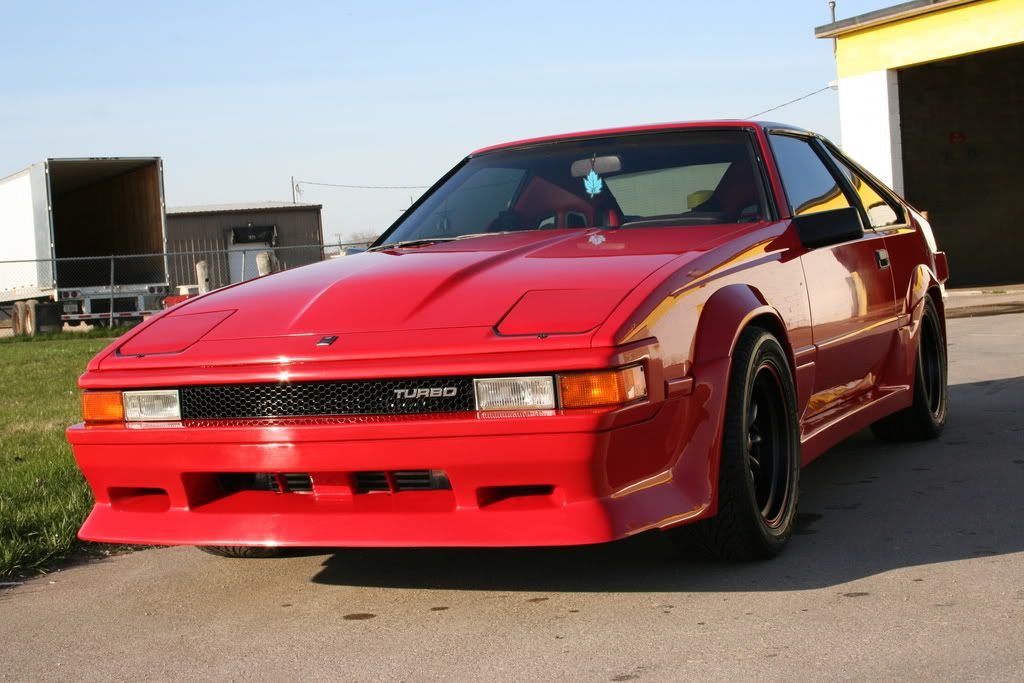
![Image]()
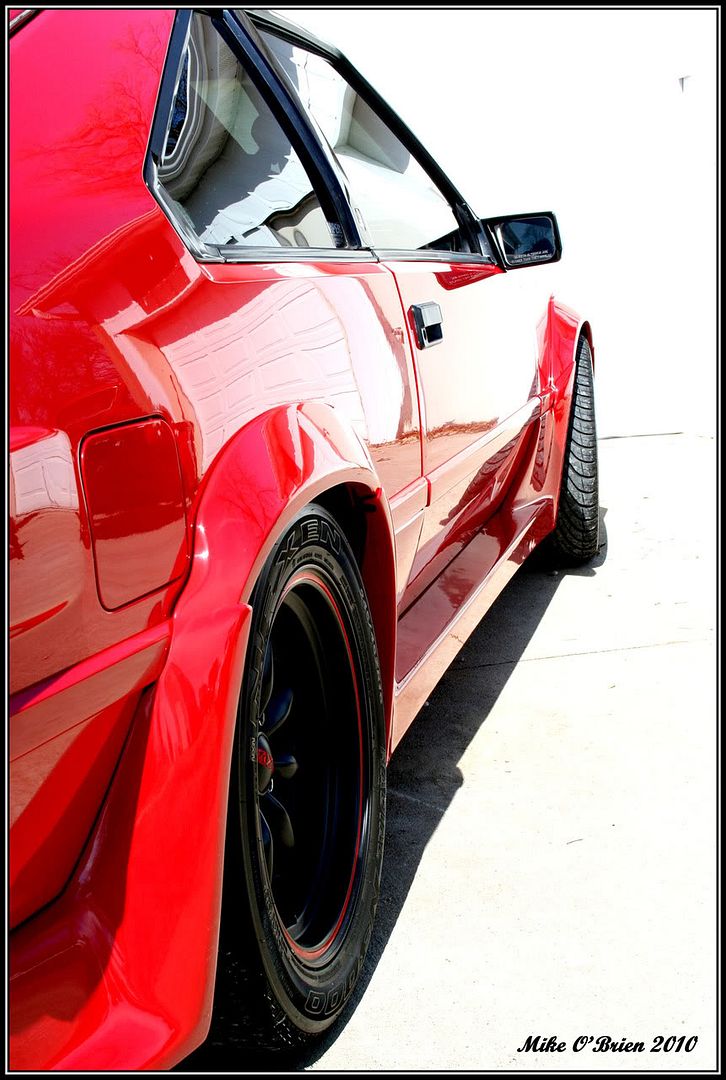
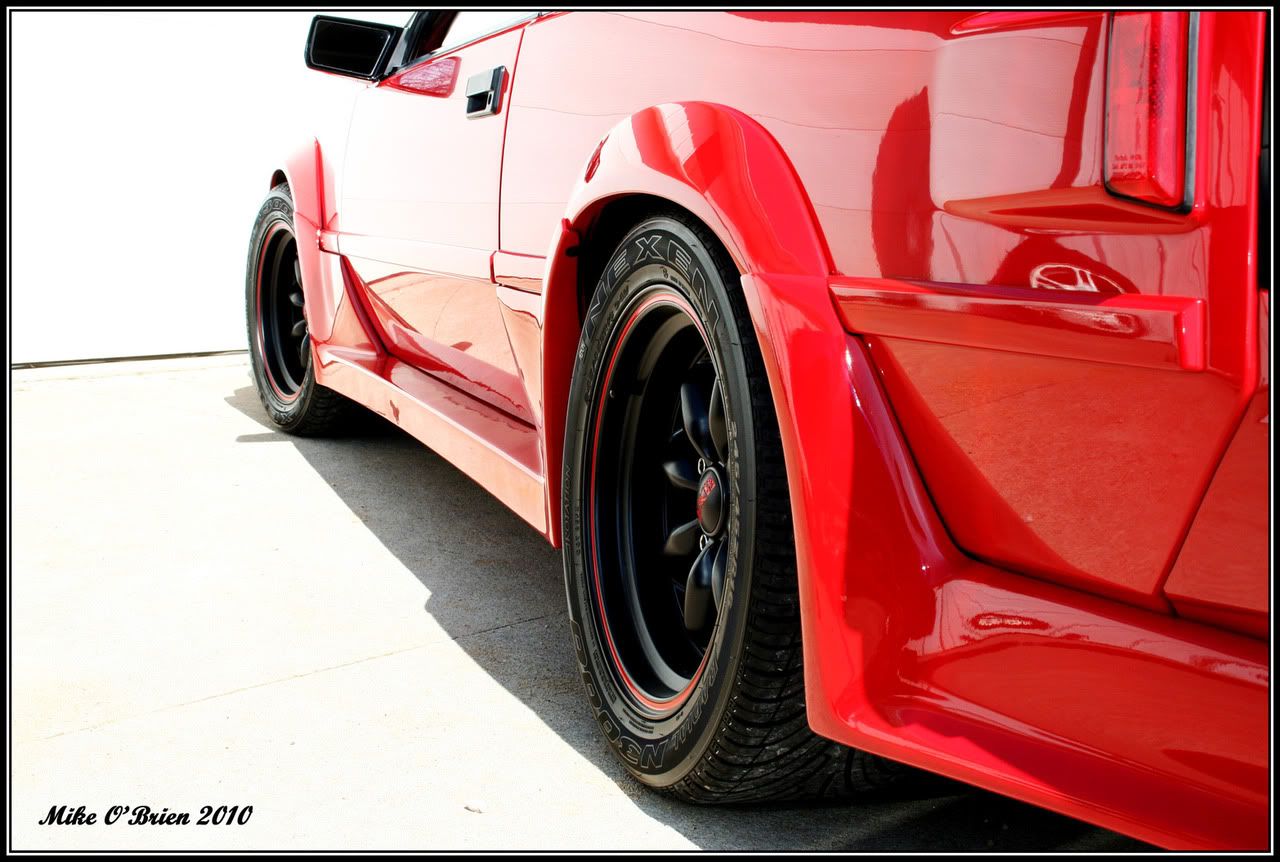
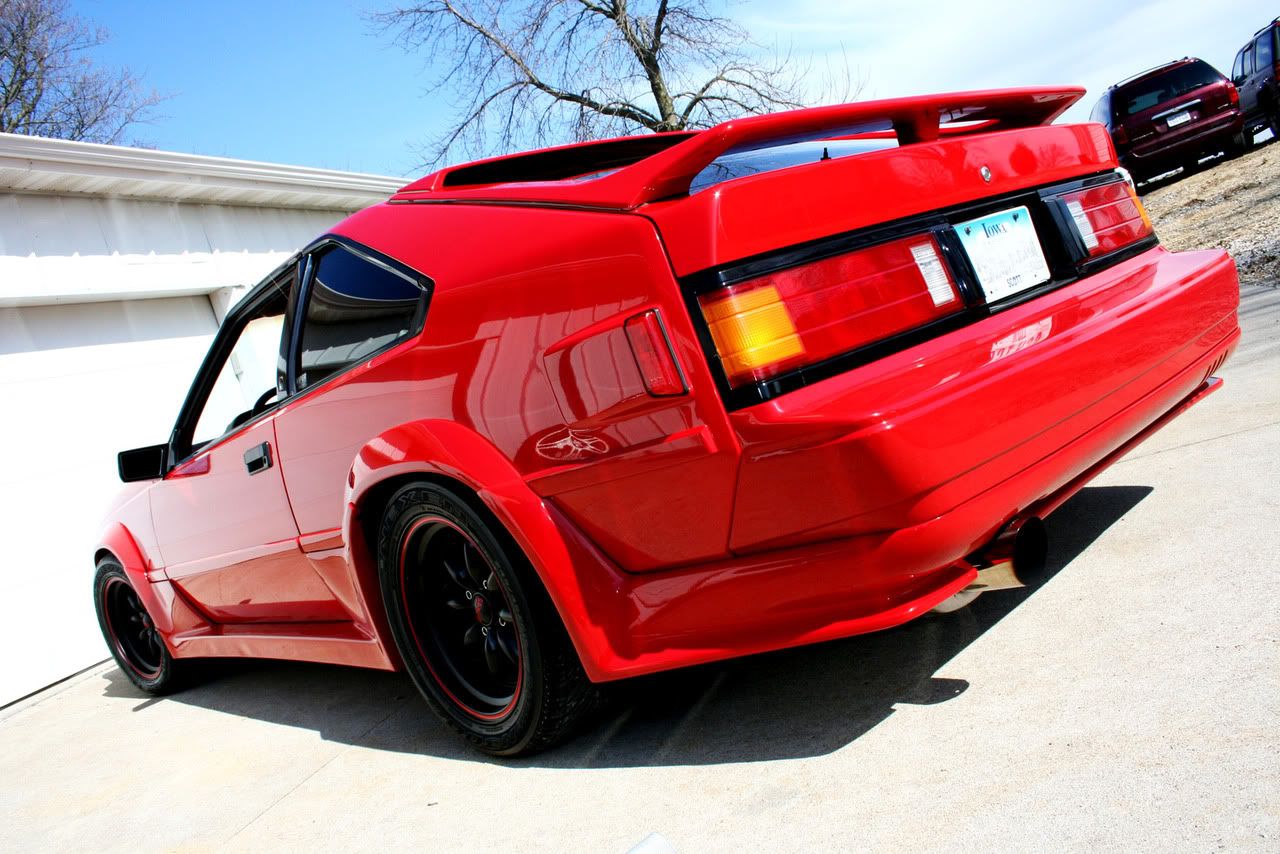
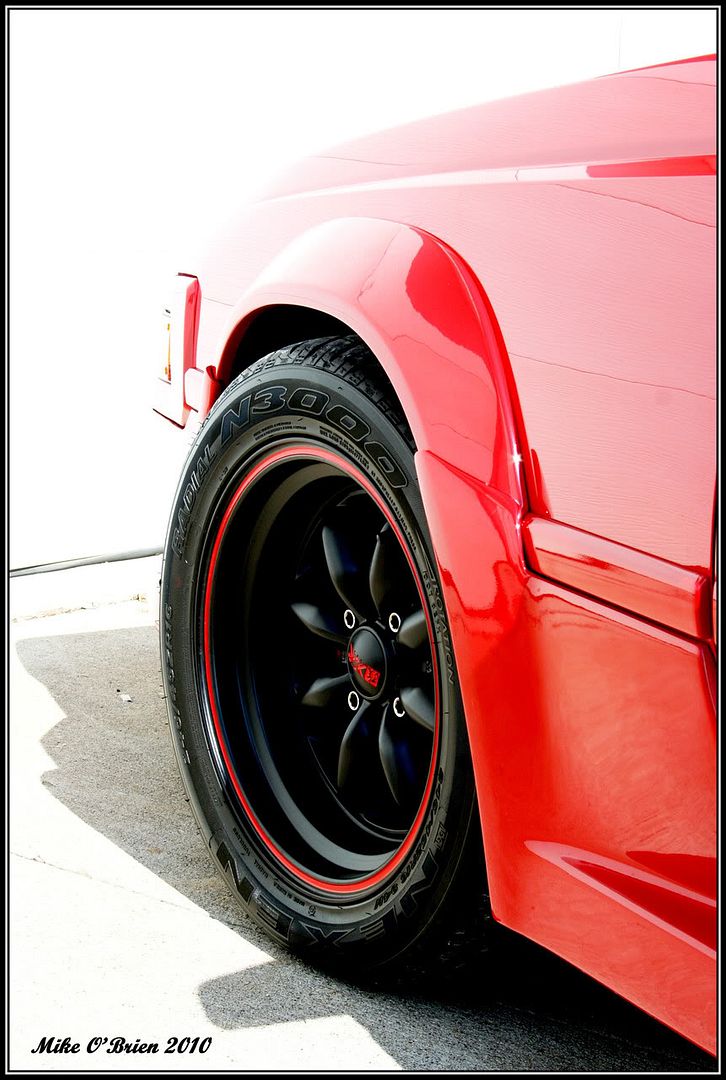
The Car: 1986 Celica Supra MA61 P-type
The Body Kit: Erebuni 631a (kit without fender flares since the P-Type already has them) It is made of fiberglass.
How do I start to put this? ……..This body kit fits like crap.
I will try to let the pictures do the talking, and comment on them:
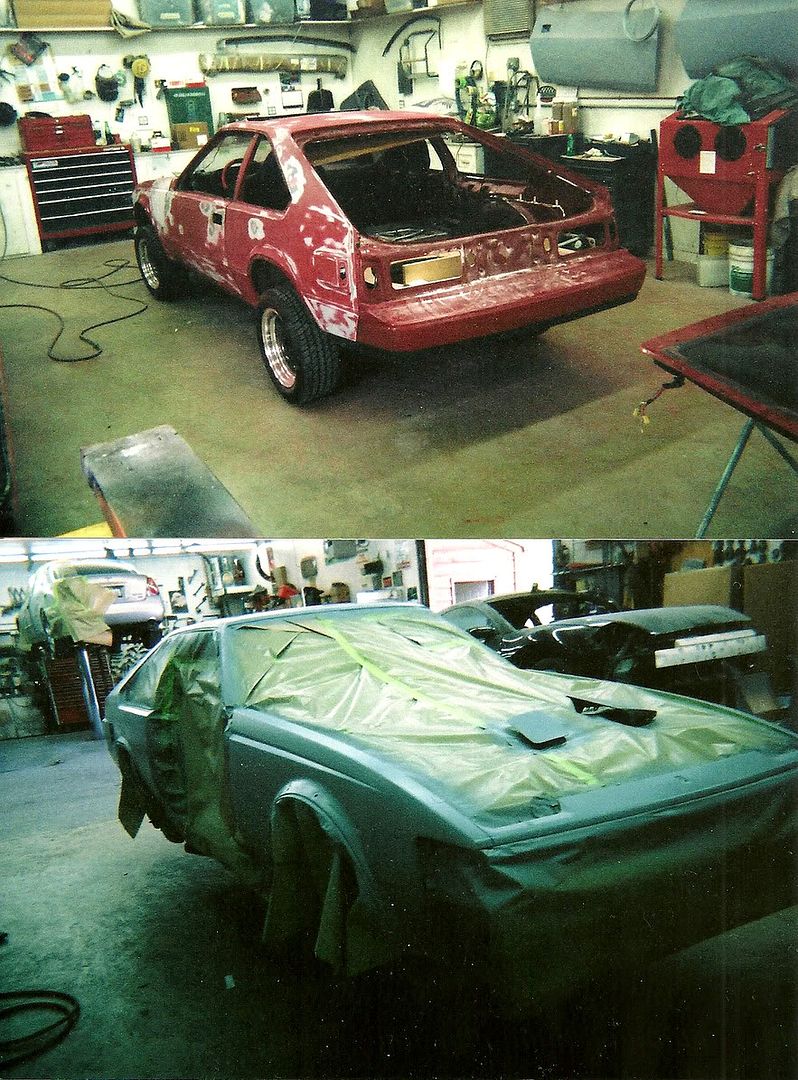
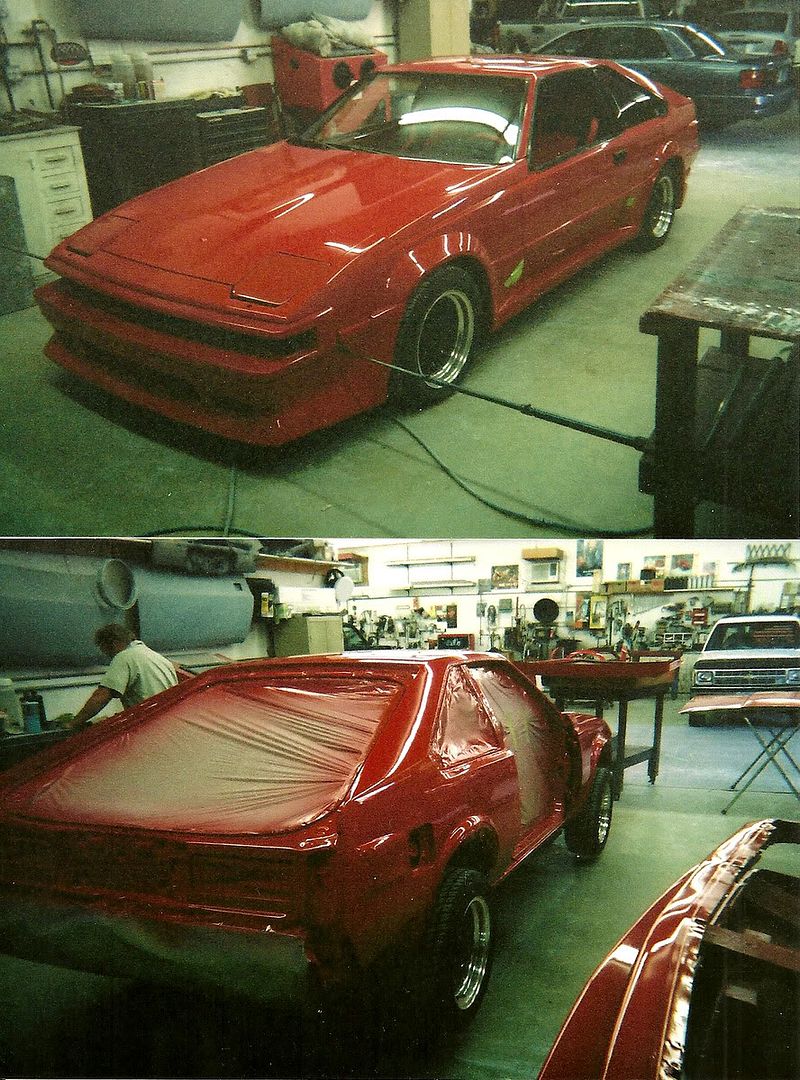
IM SORRY ABOUT THE QUALITY. My body man Jamie used a disposable camera to take pictures of the progress as he went, but primer and sanding dust slowly clouded the camera lens as it was left on the counter next to the car while it was being worked on. lol, Jamie’s fault, but it’s ok.
First off, I had an EXCELENT body guy do my paint for me. The car looks fantastic because it was a labor intensive, and extremely thorough paint job. All imperfections were worked out on the body, while all trim was removed and painted separately, save the fenders and header panel. That means that all four flairs, doors, hood, headlight covers, gas door, front bumper, rear bumper, door and fender trim, window trim, mirrors, headlight and windshield washers, seals, and all four body kit sections were painted separately from the main body. If you were to take the body kit and flairs of my car, it would still look fantastic as everything underneath it was painted also. THIS is the way to paint a car. A couple shots showing some of the painting process:
![Image]()
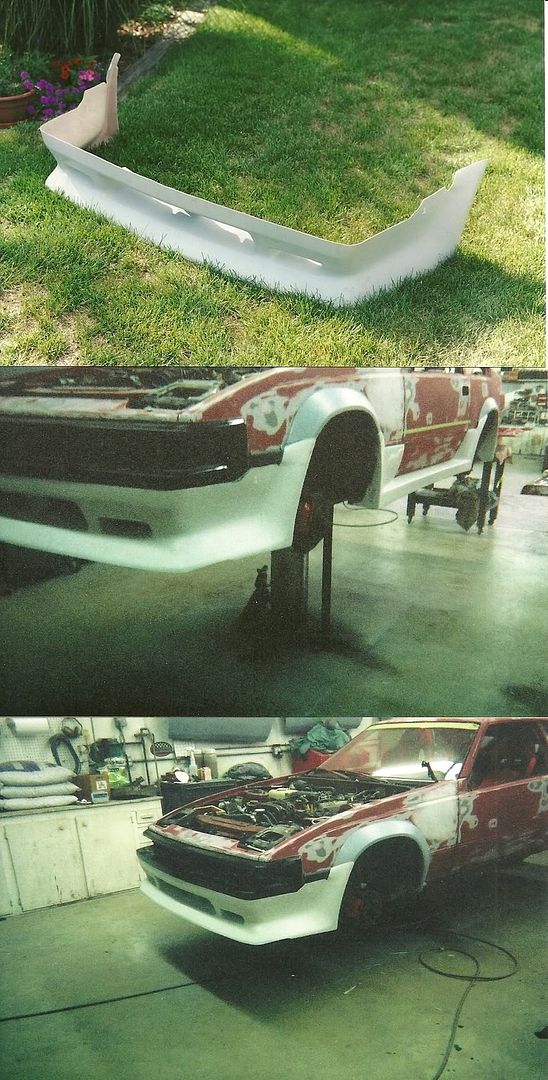
Let’s rewind to the day I got my body kit, and test fit it on the car. Let’s compare this to the bodywork needed to fix it, and the finished product:
I’ll start with the rear section. The most noticeable and horrible issue is the massive gap between the tail section and the flair arch of the rear fiberglass section. My body man had to rough the fiberglass, and mold in repair sections to fix these giant gaps to make them look so streamline. Also, a few places were trimmed so the kit was flush with the rear bumper all the way around and fit properly. He also widened the exhaust exit passageway so I could fit my Magnaflow twin tip muffler flush inside it (I do not have that muffler on it now, but it is something to consider).
![Image]()
I know it is hard to tell here, but the kit does not sit right along the bumper in these lower pictures.
![Image]()
The end result of a lot of extra work to make it look right. Compare this to the very first picture of the massive gap in the kit.
![Image]()
![Image]()
Look at how well the lines now meet along the bumper and kit seem:
![Image]()
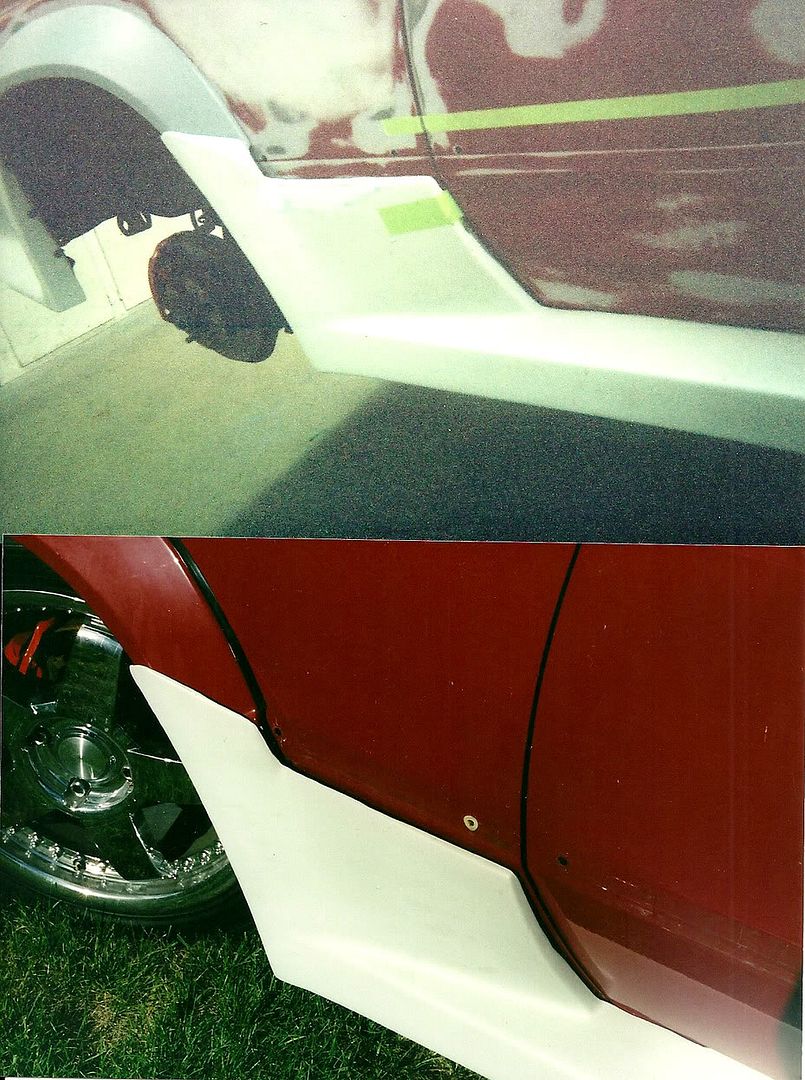
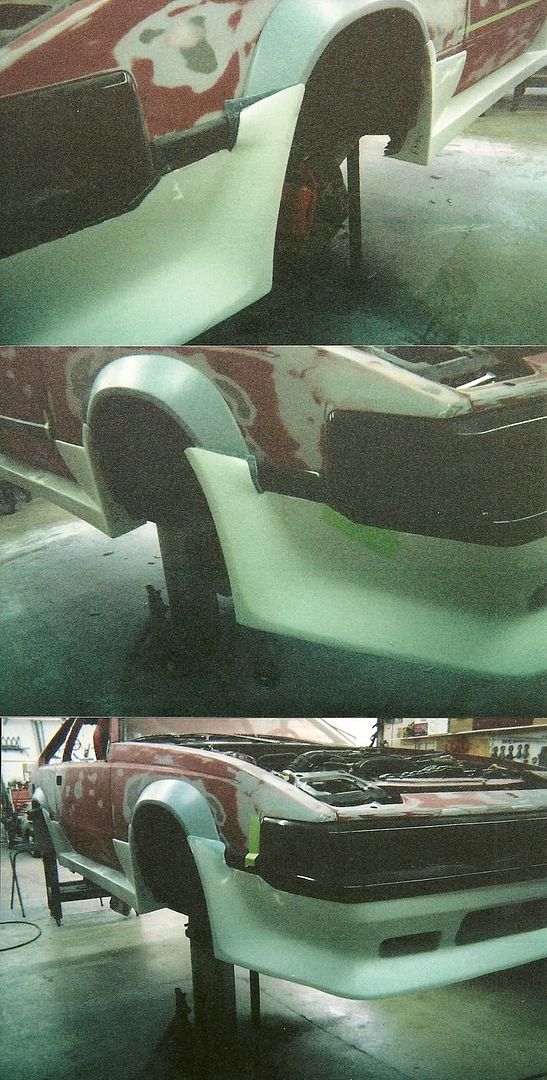
The Side skirts. These weren’t that horrible, but there was a bad problem with where the rectangular slopes meet the door seem. You can see it in the bottom first picture, where it is very uneven. Not only this, but the fiberglass portion that wraps the side trim does not do a very good job, and looks awkward. The kit was also tweaked so that the rectangular panels did not want to stay in their correct position, most likely due to the kits age and how if was stored. These things were sorted out:
![Image]()
The finished product. Notice the difference in the way the kit wraps the side trip, and how streamline the kit and car are now.
![Image]()
![Image]()
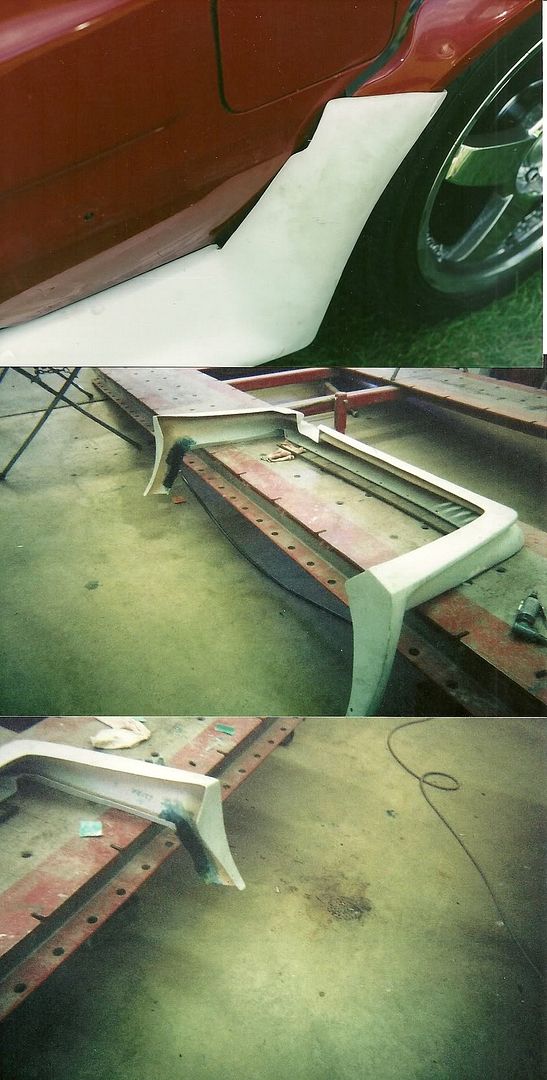
And the front section. This was the most awkward section of the kit, as it can be difficult to imagine how Erebuni expected the person installing it to actually secure it to the front of the car. Our guess was the overhang you see that I guess you would shove under the trim would be fastened to the car so the fastened would be hidden by the trim or something. But the front is still to the imagination. A lot of people who install this kit rivet the front piece on in many places, and then fill over the rivets to give a streamline look. That is not what we did, which will be explained later. Notice how terrible the profile of the bumper is where it should again wrap the trim and or follow it. It is not right at all. It is also not right where it should butt up against the front bumper section lips (the sections that is black when stock).
![Image]()
Look at the second and third pictures to how Jamie started to form the new fiberglass while the trim was still on to get a perfect contour.
![Image]()
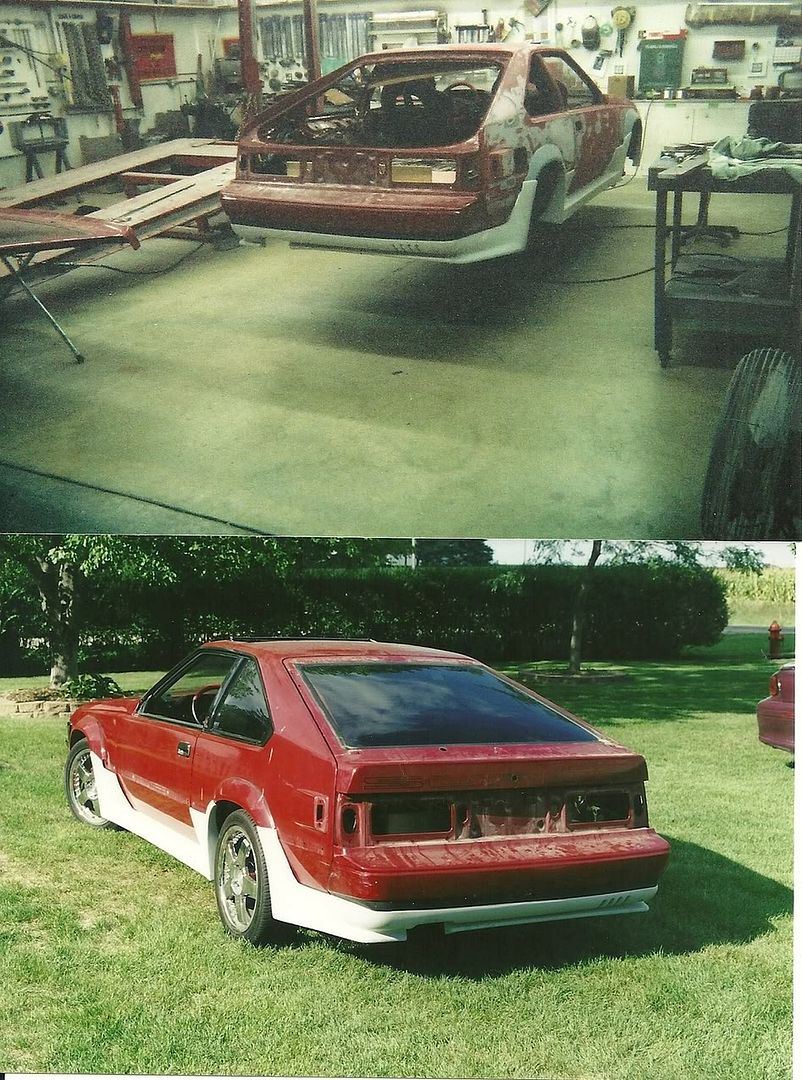
The finished product.
![Image]()
![Image]()
Now to answer how the front was fastened, it was fastened the same way the rectangular panels of the side skirt were bonded. Jamie used a sort of extremely strong auto panel epoxy with some special properties. The glue is strong enough to hold the sections on without worrying that they separate on their own, but can be heated and forced in a way that it will separate under just the right conditions if need be. If you rivet the front valence onto your bumper, what happens when you hit a possum at 70 MPH on the interstate? How do you repair the damage? By the time you pried al the rivets out, you will have mangled the bumper so bad you would have to buy another section and re-fit it. With this epoxy, If I ever damage the front (which I sadly did once) of sides, they can be removed without harm to the sections OR the paint and body underneath. This epoxy is on the same lines of what is used to attach the fiberglass and aluminum body panels on big city busses and campers.
You have to lol at how the bumper is supported while the glue dries. Also, a random picture of the body after base and clear was shot. See how underneath the body kit, there is still a newly painted section?
![Image]()
All in all what are my impressions of the kit?
A big waste of money and time.
The money spent on the kit, the ridiculous shipping charged for the box it came in, and the additional body shop hours needed to repair the mangled kit could have been spent on much more needed items.
Like what you say? I would have loved to replace some more of the window trim with Toyota replacements (if they were available at the time). We had bought Toyota replacements for the really bad trim, like some of the side moldings and both of the lower rear quarter window trim, but the money wasted on the kit could have gone to more NOS parts.
If I could do it again, the car would have been repainted in the stock theme, but in the same shade red. All the black accents would have been kept thought.
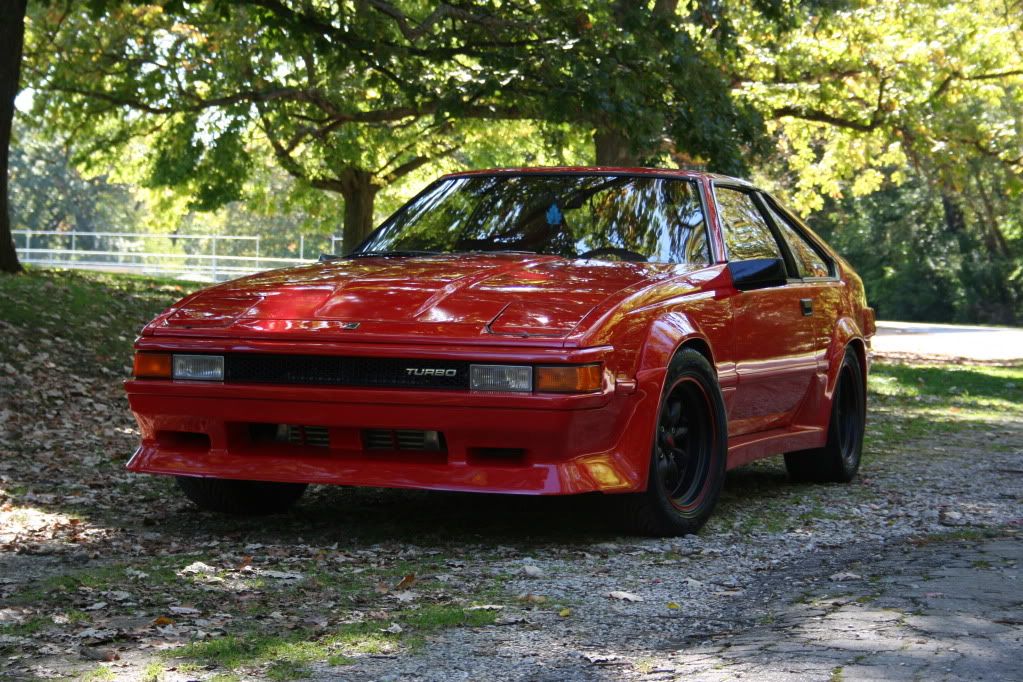
I could have been well on my way to some extremely nice custom wheels that fit the car to a T with the money spent with the kit, but what is done is done. I love my car, it looks great (I think at least), and I love knowing how much special attentions the car has had to look the way it does.
I made this thread to inform others of things to consider if they run across the Erebuni kits, Duraflex, Kaminari or what-have-you.
Others that have body kits, it would be nice if you have any pics to post, to do a similar review of what it took to get where you are, and you thoughts and opinions on the matter (but probably not as dramatic as mine, lol).
Thanks, and please…… No more body kit PM’s…
-Mike
MODS, feel free to move this to anywhere (even toilet)
I am making this thread for one simple reason: repetition. Most people would agree I’m not a rude person; some may say I’m a bit of a pushover when it comes to going out of my way to give someone info that really shouldn’t have to be spoon fed to someone. I’m not intentionally complaining, but every week or two I get about two or three Pm’s where people ask me, “Hey man, sick car. What body kit is that? Do you like it? Thanks man!” Now I am not trying to toot my own horn, but yes, I know my car looks good with my body kit, but there is a reason why it looks nice. Back on subject, these Pm’s don’t really annoy me that much, until now. It seems that they are becoming more frequent, and when I stop to spend a few minutes per Pm to reply and give them a short synapse of my body kit and how I feel about it, the time spent replying to these PM’s is beginning to build up. I have stated how I feel about the body kit many times in many threads and PM’s, but I am going to write it now in a thread with body kit in the title, so hopefully those who search can actually find this, and hopefully answer their own questions instead of assembly lining them back to me or others on the forum.
The Car: 1986 Celica Supra MA61 P-type
The Body Kit: Erebuni 631a (kit without fender flares since the P-Type already has them) It is made of fiberglass.
How do I start to put this? ……..This body kit fits like crap.
I will try to let the pictures do the talking, and comment on them:
IM SORRY ABOUT THE QUALITY. My body man Jamie used a disposable camera to take pictures of the progress as he went, but primer and sanding dust slowly clouded the camera lens as it was left on the counter next to the car while it was being worked on. lol, Jamie’s fault, but it’s ok.
First off, I had an EXCELENT body guy do my paint for me. The car looks fantastic because it was a labor intensive, and extremely thorough paint job. All imperfections were worked out on the body, while all trim was removed and painted separately, save the fenders and header panel. That means that all four flairs, doors, hood, headlight covers, gas door, front bumper, rear bumper, door and fender trim, window trim, mirrors, headlight and windshield washers, seals, and all four body kit sections were painted separately from the main body. If you were to take the body kit and flairs of my car, it would still look fantastic as everything underneath it was painted also. THIS is the way to paint a car. A couple shots showing some of the painting process:
Let’s rewind to the day I got my body kit, and test fit it on the car. Let’s compare this to the bodywork needed to fix it, and the finished product:
I’ll start with the rear section. The most noticeable and horrible issue is the massive gap between the tail section and the flair arch of the rear fiberglass section. My body man had to rough the fiberglass, and mold in repair sections to fix these giant gaps to make them look so streamline. Also, a few places were trimmed so the kit was flush with the rear bumper all the way around and fit properly. He also widened the exhaust exit passageway so I could fit my Magnaflow twin tip muffler flush inside it (I do not have that muffler on it now, but it is something to consider).
I know it is hard to tell here, but the kit does not sit right along the bumper in these lower pictures.
The end result of a lot of extra work to make it look right. Compare this to the very first picture of the massive gap in the kit.
Look at how well the lines now meet along the bumper and kit seem:
The Side skirts. These weren’t that horrible, but there was a bad problem with where the rectangular slopes meet the door seem. You can see it in the bottom first picture, where it is very uneven. Not only this, but the fiberglass portion that wraps the side trim does not do a very good job, and looks awkward. The kit was also tweaked so that the rectangular panels did not want to stay in their correct position, most likely due to the kits age and how if was stored. These things were sorted out:
The finished product. Notice the difference in the way the kit wraps the side trip, and how streamline the kit and car are now.

And the front section. This was the most awkward section of the kit, as it can be difficult to imagine how Erebuni expected the person installing it to actually secure it to the front of the car. Our guess was the overhang you see that I guess you would shove under the trim would be fastened to the car so the fastened would be hidden by the trim or something. But the front is still to the imagination. A lot of people who install this kit rivet the front piece on in many places, and then fill over the rivets to give a streamline look. That is not what we did, which will be explained later. Notice how terrible the profile of the bumper is where it should again wrap the trim and or follow it. It is not right at all. It is also not right where it should butt up against the front bumper section lips (the sections that is black when stock).
Look at the second and third pictures to how Jamie started to form the new fiberglass while the trim was still on to get a perfect contour.
The finished product.
Now to answer how the front was fastened, it was fastened the same way the rectangular panels of the side skirt were bonded. Jamie used a sort of extremely strong auto panel epoxy with some special properties. The glue is strong enough to hold the sections on without worrying that they separate on their own, but can be heated and forced in a way that it will separate under just the right conditions if need be. If you rivet the front valence onto your bumper, what happens when you hit a possum at 70 MPH on the interstate? How do you repair the damage? By the time you pried al the rivets out, you will have mangled the bumper so bad you would have to buy another section and re-fit it. With this epoxy, If I ever damage the front (which I sadly did once) of sides, they can be removed without harm to the sections OR the paint and body underneath. This epoxy is on the same lines of what is used to attach the fiberglass and aluminum body panels on big city busses and campers.
You have to lol at how the bumper is supported while the glue dries. Also, a random picture of the body after base and clear was shot. See how underneath the body kit, there is still a newly painted section?
All in all what are my impressions of the kit?
A big waste of money and time.
The money spent on the kit, the ridiculous shipping charged for the box it came in, and the additional body shop hours needed to repair the mangled kit could have been spent on much more needed items.
Like what you say? I would have loved to replace some more of the window trim with Toyota replacements (if they were available at the time). We had bought Toyota replacements for the really bad trim, like some of the side moldings and both of the lower rear quarter window trim, but the money wasted on the kit could have gone to more NOS parts.
If I could do it again, the car would have been repainted in the stock theme, but in the same shade red. All the black accents would have been kept thought.
I could have been well on my way to some extremely nice custom wheels that fit the car to a T with the money spent with the kit, but what is done is done. I love my car, it looks great (I think at least), and I love knowing how much special attentions the car has had to look the way it does.
I made this thread to inform others of things to consider if they run across the Erebuni kits, Duraflex, Kaminari or what-have-you.
Others that have body kits, it would be nice if you have any pics to post, to do a similar review of what it took to get where you are, and you thoughts and opinions on the matter (but probably not as dramatic as mine, lol).
Thanks, and please…… No more body kit PM’s…
-Mike
MODS, feel free to move this to anywhere (even toilet)


